Friday, October 28, 2011

Never throw out another old t-shirt!

I'll admit it.  I like instant, or near-instant, gratification.  I think that's why I picked t-shirt scarves as my first real crafting project.  I was pinning away over on Pinterest (you should follow me if you aren't already, see the button on the right) and I saw a number of recycled, or "up-cycled" t-shirt crafts that I thought looked pretty easy.  Not to mention cheap (or free! in my case).

Basically, I'm a fan of the 15 minute craft. :)

Also in my pinning extravaganza, I saw quite a few tutorials on making fabric flowers.  So I thought, why not combine the two and making a fancy t-shirt necklace.

Here's what I needed (note, I included the t-shirt and flower supplies):
White felt, hot glue gun and sticks, t-shirt, fabric.  If you just want to make the t-shirt scarf/necklace and no flower, literally all you need is a t-shirt and some scissors.

The first couple of t-shirts I used were from Goodwill (all t-shirts are $1.92 in my area).   The size of the t-shirt will determine how long the necklace will be.  If you use an adult X-large or XX-large you will get a necklace that is long enough to double up.  For this one, I wanted one that would be decently long, but not so long that I needed to double it up (the larger ones hung down to my waist if they weren't doubled up.)  I discovered that if you go to the craft section at Wal-Mart or if you go to Michaels, you can find plain t-shirts in all kinds of colors that are pretty cheap.  This green one is a child's small t-shirt from Michaels that cost $2.50.  Or just look in your closet and find one you don't wear anymore, then it will be free. :)  This is a particularly nice way to reuse a shirt that has stains on it, because (as long as they are small) you won't notice them at all.

  One important thing to note: use a t-shirt that doesn't have a side seam.  This will be important after you stretch them out; if it has a side seam, it might tear.

Once you've picked your shirt, it's time to start cutting it up!

First cut off the hem at the bottom:
Save this for other projects, like making a flower out of it!

Next, start cutting the t-shirt in long strips across the width of the shirt.  They don't have to be perfectly straight or the same width, I think mine were about 1 - 1.5 inches.  You can vary the width of them to make it a little more interesting.
(That's Millie making a cameo appearance in the background!)
Keep cutting strips until you get to the armpit of the shirt.  Of course, how far you can cut will depend on if you have any designs on the back or front of you shirt.
You can see that I have a hard time cutting in a straight line.

Gather all of the strips you are going to use for the necklace.
Now stretch, I mean really stretchhhhhh them.  I like to step on one end and pull on the other.
Here's what it will look like when you are done:

And this is why it doesn't matter how neatly you cut them.  When you stretch them, the sides will curl up on itself, so you don't really see the cut edges.

Now, you could pretty much wear it just like this if you wanted to, but if you want to secure them, you can take one of the loops and twist it around the others to bind them together.
Just start wrapping the loop over itself.

I like to go back and forth, in kind of a "v" formation.  This is what it will look like when you are done:
Just tuck the end of the loop underneath itself to secure at the end.

Now, you could certainly stop here, but I thought I would add some flower embellishments.  To make those, I used that white fabric, although any long strip of fabric will do.
(Excuse the mess, I'm messy when I craft.)
My strip of fabric was about 2 inches wide and about 3-3.5 feet long.  The length of your strip will determine how big your flower will be.

Clearly, the fabric is not perfectly cut, but thankfully, that doesn't matter even a little bit. (My kind of craft!)

I like to put felt on the back of my flowers.  A lot of the tutorials you see won't include that step, but I like them to be a little sturdier than just gluing the fabric to itself.  Not to mention, when I was just gluing the fabric to itself, I was getting more glue on my fingers than on the flower. Ouch!  I think you could probably use fabric glue for this, but hot glue seems to be the best choice.
I cut out a felt circle that was slightly smaller than how large I wanted the flower to be.


Next, fold your fabric in half:

And start folding/rolling it to get your flower started:
Keep rolling it until you have about a dime size flower started:
At this point, I like to glue the bottom of the flower to the felt:
Now start twisting the fabric (I like to twist the fabric away from the flower, but I think this is just personal preference) and gluing it to the felt:
(Sorry for the blurry picture)
Keep twisting and gluing:
Once you get larger than the felt, you can start gluing the fabric to the flower itself, a little bit of glue near the bottom of the flower is all you need:
And then when you're done, tuck the end of the fabric strip under your flower and secure with glue:
Here's what it looks like from the front:
So it's not perfectly round. :) I kind of like a more "free-form" flower anyway.  

I've used safety pins on the back of flowers to secure it, like this:

But for this one, I thought I would use a little bit of the same fabric as for the flower and tie it to the necklace:
(I realize this is a green flower, but it's the only one I took a picture of the back.)

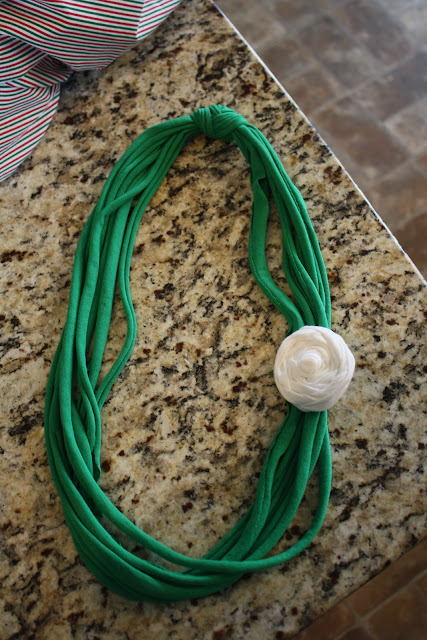
You could stop here with one flower:
Cute, right?  But why make just one, when you can make lots!
(The little flowers are made the same way, just with a shorter strip of fabric.  Also, the green flower was made from the hem of the t-shirt.  See, don't throw anything away!)
I think it would also be cute to make it a little Christmas-y with some striped fabric:
Here's the striped flower up close:
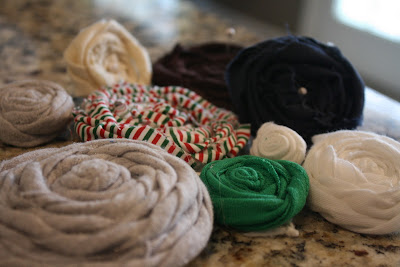
A collection of some of the flowers that I (or my sister, Kari) have made:
All of the fabric is either repurposed or from Goodwill.  Yay!

Here's another tip: if you start out making a small flower and then decide you want to make a bigger one, easy peasy, just add another strip!  Just secure the end of the first strip to the back of the felt (or just underneath the flower) and then start the second strip in the same spot:
Your flower will look exactly the same as if you had cut the strip in the right length in the first place (the larger one on the bottom was the one I added to):
 My final arrangement of flowers, at least for now:
As I was putting things away, I happened to stack the small green one on top of the striped one and it gave me an idea: 2 different strips to make the same flower!

Ca-yute!  I think for my next flowers, I'm going to put them on alligator clips, something like these:
here
 I'd like to give a shout out to all the Pinterest and DIY bloggers out there that inspired these crafts, particularly this one and that one.

So, this was my first blog tutorial. Too many pictures, not enough pictures?  Steps clear and easy to follow?  I'd love to hear if you have any tricks or tips or ways you've changed it up. xo april

Why I DIY

If you aren't a follow of Kate over at Centsational Girl, you should be.  I read a post of hers this morning that really touched my heart.  You can find it here.  She nailed the answer to the question "Why do you DIY?".

Many people think the time, money, energy, etc. it takes to do something yourself could be better spent elsewhere.  Now, I'll be the first to admit some things aren't worth stressing over doing it myself.  Most car-related things, for instance.  I know, I know, I could change my oil myself, but, quite honestly, I have no interest in learning how to do it.

here

Crafting, on the other hand, I want to learn.  Following Kate's lead, I won't refer to myself as uncreative, but I will say that I am... shall we say... uncoordinated.  I am not a fine painter. Or sculptor. Or musician.  Or a number of other pursuits that take skill and talent.  But what I can do is try something.  I started small, so that if things turned out disastrously I wasn't out a lot of time and money.  But here's the thing.  It didn't turn out to be a disaster, AND it turned out exactly how I imagined.  Now, granted, it was cutting strips from a t-shirt, but honestly, I had zero confidence I could create something.

here

I think that's mostly what it comes down to.  Confidence.  I think this translates to a number of pursuits.  Cooking is a good example.  Most people could probably follow a recipe, particularly a relatively simple one, but I know so many people who won't even try it, for fear that it will turn out inedible and they will have wasted their efforts.

here

My challenge to you, dear friends, is to not sit on the DIY sidelines (if this something you're actually interested in, of course!).  Don't just "pin it and forget it."  There are tons, TONS, of step-by-step tutorials on making simple crafts or recipes, or whatever else you are into creating, out there in the blogosphere.  Try one of 'em and report back.

xo april

P.S. T-shirt scarf tutorial is coming later today. 


Wednesday, October 26, 2011

A preview of what's to come...

Hi friends!  I had a few minutes, so I thought I would post a few pictures of past, present, and future projects.  No worries though, this is just a preview, there's LOTS more to come. =)

First up is my favorite finished project to date: (and I apologize for the poor picture quality, my early project pictures were taken on my phone.  I didn't realize I would use them for anything official.)


I was tired of my old dingy whiteboard on my office door, so I spruced up a ($1!) yard sale picture frame.  I promise I'll share my secret for perfect chalkboard writing.


Other projects I've finished:


Wait until you see what I did with this... (this isn't quite a before picture, I had already started sanding it)


But this, THIS, is the project I'm currently most excited about:
A $35 dresser from Goodwill.  It may be difficult to tell in this picture but the finish definitely needs some TLC.  My plan is to sand and restain, but that may be a lost cause and it will end up being painted.  This is my big project for the weekend, so stay tuned...

Here's a close up of the hardware.  This dresser was a total steal, in my opinion.
Goooorgeous, right?!!

I hope this little preview got you excited for upcoming posts!  This blog isn't just about me and my projects though, I'd love to hear about anything you might be working on.  Email me and send pictures: diveintodecorating{at}gmail{dot}com.  I'd love to feature your project on a future post.
XO april

Monday, October 24, 2011

Crafts for the uncrafty

My first blog post! This blog will be a place for me to share my tips, tricks, crafty before-and-afters, and, hopefully (!) the process of buying a house and making it into a home.

A little about me:
I've always wanted to have a creative outlet, but I just might be the least creative person on earth. People who can come up with an idea and see that idea to fruition amaze me; and I never thought I would be one of those people.

I've been a long time admirer of decorating shows, first TLC's Trading Spaces and then, later, shows on HGTV. In particular, I'm drawn to the shows that demonstrate decorating on a budget, creative uses for repurposed materials and thrift items. I've also become addicted to decorating and DIY blogs, such as Apartment Therapy, Thrifty and Chic, and Young House Love. They make things look so simple, creating something beautiful out of nothing!

However, for a long time I was content to drool over their beautifully decorated homes and creations, until one day I wondered, could I, Ms. Oh-So-Uncrafty, actually create.

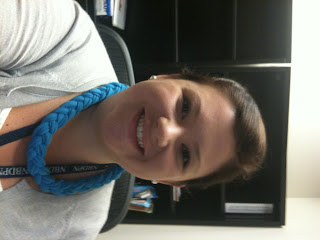
My first project was really simple: strips cut from an old t-shirt, stretched and secured with one of the extra strips. I added a flower made from another long strip of material and some hot-glue. I was so very proud when I wore my new t-shirt scarf/necklace the next day and I was able to respond to compliments with, "Well, actually, I made this myself."

I was hooked.

My projects are slowly getting more complicated. I've upgraded to spray paint and nail guns and chalkboard paint (my favorite)! I have a dresser waiting for me to refinish it. I plan to fill my soon-to-be-purchased house with repurposed materials and bargain finds. I'm hoping to find a fixer-upper (i.e. new paint and cosmetic work;  not a new roof) that I put my own mark on.

In the coming days and weeks, I'll share the projects I've already got going, with tutorials and before and after pictures.

Thanks for checking out my blog!